OPS345
Introduction to AWS Networking
Eric Brauer
Before You Start:
- Finish Lab 1!
- Review networking concepts if necessary
Diagram
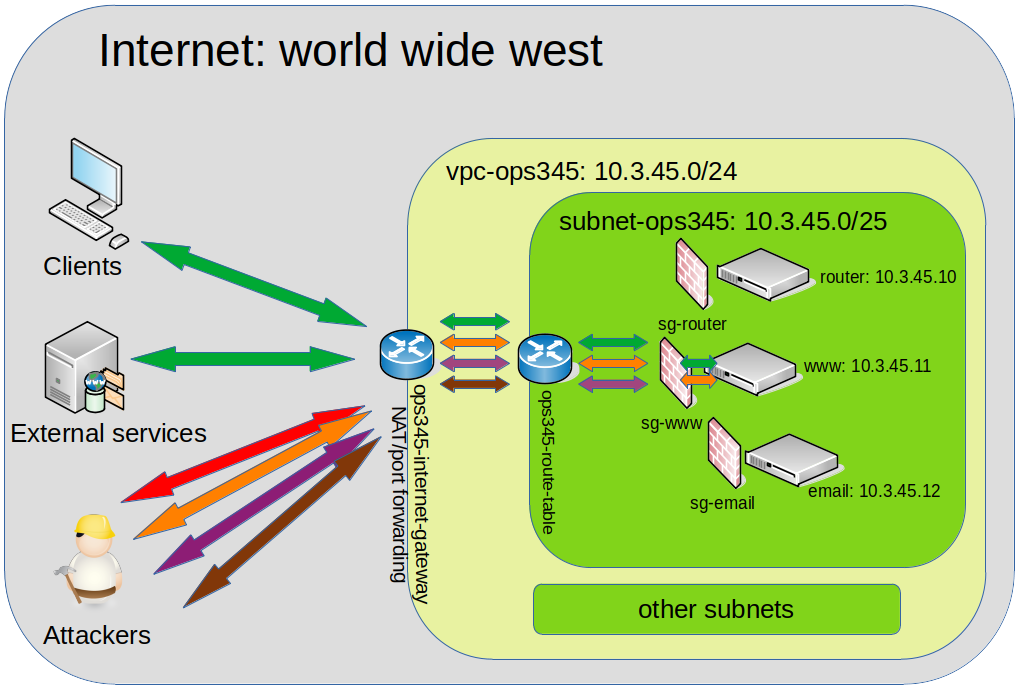
Lab 2
- VPC
- Subnet
- Internet Gateway
- Route Table
- Router VM
- ‘WW’ VM (used for testing)
AWS Abstraction
Since everything is ‘In The Cloud’, we don’t have to do things like plug ethernet cables into humming grey boxes. That stuff still exists, but it doesn’t exist at the level of abstraction that we’re working on. Keep that in mind.
Working with AWS will be a little different from the networking that you’re used to:
- VPC
- Elastic IP
VPC
Virtual Private Cloud. This is a way for us to abstract a LAN, essentially.
- Lets us create a private, isolated section of the Cloud to work on.
- Once an IP range is specified, we can create subnets and have instances communicate with each other
- Once we set up a Gateway, instances in the VPC will be able to connect to the outside world.
VPC Vs. Subnet
- Inside our VPC, we will also create a subnet.
- 10.3.45.0/24 VS 10.3.45.0/25
CIDR Review
| 255 | 255 | 255 | 0 |
|---|---|---|---|
| 8 bits | 8 bits | 8 bits | 0 bits |
- 8 bits = 1111 1111 = 255 in Decimal.
- 8 + 8 + 8 = 24 bits are masked off.
CIDR Review
| - | - | - | 1111 1111 |
|---|---|---|---|
| - | - | - | 8 bits |
- How many addresses are available in our VPC?
CIDR Review
| 255 | 255 | 255 | 1000 0000 |
|---|---|---|---|
| 8 bits | 8 bits | 8 bits | 1 bit |
- 8 + 8 + 8 + 1 = 25 bits are masked off.
CIDR Review
| - | - | - | 0111 111 |
|---|---|---|---|
| - | - | - | 7 bits |
- What is the decimal value of
0111 1111? - What is the address range inside our subnet of 10.3.45.0/25?
- How many addresses available inside our subnet? Outside of it?
Gateway
This will allow machines inside our VPC to connect to the Internet
(for example, so that we can run yum update!)
Notice we connect this to the VPC.
Routing Table
- This is required to make our Gateway useful. At first:
| Destination | Target |
|---|---|
| 10.3.45.0/24 | local |
Routing Table
- Now we will add the following rule:
| Destination | Target |
|---|---|
| 10.3.45.0/24 | local |
| 0.0.0.0/0 | your gateway |
- In order words, traffic headed for all IP addresses that aren’t included in 10.3.45.0 - 10.3.45.255 should be routed to the Gateway.
Router
- Create a Router instance. Follow (and review!) the steps from Lab 1.
- Remember to create a new security group for the router. You will return to this security group to modify it.
- Give this router a primary IP address of 10.3.45.10.
Public Vs. Private IP Addresses
- 10.3.45.10 is a private IP address, it only points to our router instance inside our private cloud.
- Private IP addresses are cheap because they only exist inside our network. (why do you think everyone’ IP address at home starts with 192.168.0??)
- Public IPv4 addresses are in short supply! We are running out of them!
- Public IPv6 not so much, but inertia is strong and nobody wants to deal with IPv6 😎
- Amazon has deep pockets and has a bunch of public IP addresses for us.
Dynamic Vs. Static IP Addresses
- Note that the instances we’ve created so far have been given public IP addresses that we use to SSH to them.
- Public IPs are reset each time the instance reboots.
- AWS maintains a pool of public IP addresses that it leases out to our VMs as they are powered on.
- It would be more convenient to have a static public IP address, so that we don’t have to look up the IP each time we start a new lab.
Elastic IP Address
- This is like a more long-term lease of a public IP address.
- It comes from the same pool of public IP addresses that AWS has used so far.
- When you Allocate an Elastic IP, it is removed from the pool until you are finished with it.
- So having an elastic IP will cost you money regardless of whether your instances are powered on or not.
Router Configuration
- Ok, we can SSH into the Router instance because:
- The Security Group Inbound rules allow us (0.0.0.0/0) to reach the router, and
- we have the correct private key.
- However, when we create the ww instance, we cannot SSH to it.
- The Security Group Inbound rules don’t allow us to reach it.
- The router instance is allowed to SSH into ww, but
- The router doesn’t have our private key on it.
Port Forwarding
- We will set up port forwarding so that port 2211 will be open on the router.
- Any traffic sent to port 2211 on router will be forwarded to port 22 on ww.
- Time to review
iptables
Port Forwarding
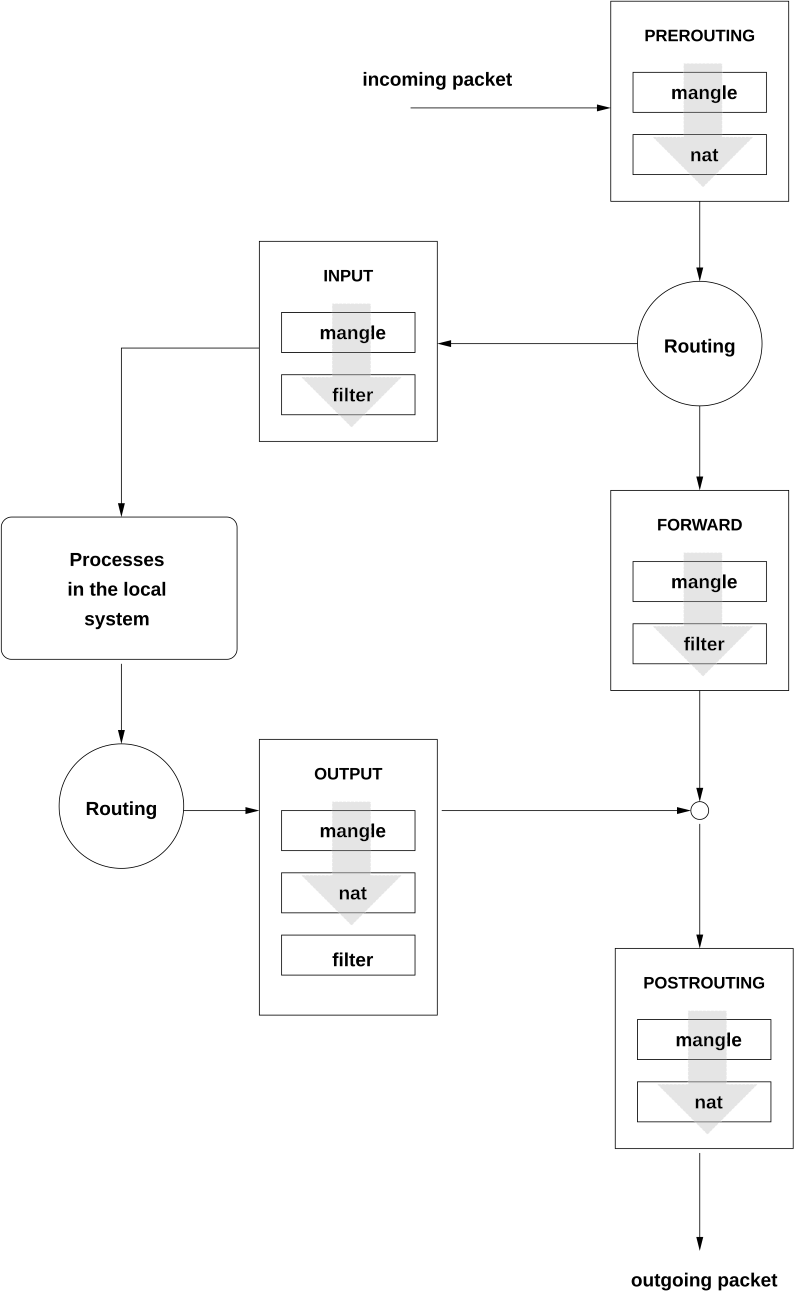
iptables Review
The iptables commands are provided for you (check the
screenshot) but you should take a moment to recognize what they are
doing:
- We are creating one rule in a PREROUTING CHAIN.
- We are removing a blocking rule from the FORWARD table.
- We are creating one rule in a POSTROUTING CHAIN. (we’ll cover masquerade later on)
Don’t forget the Security Group!
- Even though routing rules are set up on router instance, nothing will happen unless you allow inbound traffic on port 2211 in the correct security group.
Test As You Go!
- Check your work
- If you encounter an error, fix it before proceeding.
- Otherwise you will never know if it was the latest change that broke everything, or something you ignored 7 steps ago.
- Troubleshooting sucks, but backtracking sucks more.