
In this course, you will:
+= operator to increment variablesMost of the programs we will be creating in this course are relatively simple. Large applications such as word processors can contain hundreds of thousands of lines of code. As you will see though, even our simple programs can become quite complicated to follow, especially as we introduce loops.
Part of this lab will focus on ways of planning our code, and on using VSCode’s debugger to study our code as it runs.
In the last lab, we introduced if conditions which look like this:
num = int(input("Enter the answer to 12 + 14: "))
if num != 26:
   print('Sorry, this is incorrect.')
   print('0 points awarded.')
print('Next question...')
As we have learned, the if statement checks a condition and if it is true, we proceed to the instructions in the code block immediately below. The code block is defined by indentation; any code that is aligned with the indent is considered part of that code block.
The instructions in the code block run only once, and then the program runs normally, running each instruction in sequence.
Often, however, we want to repeat a set of instructions. Maybe we are processing many files, or perhaps there was an issue with user input and we want them to try again. As you can see from our example above, not giving the user another attempt at the question is not conducive to learning, in order to improve we need to make mistakes, and then correct them!
With the while loop, we are testing for a condition as before. However, the code inside of our block is repeated as long as the condition remains true. The program proceeds as normal once that condition becomes False.
num = 0  # we need to define a starting value before testing it for conditions
while num != 26:
    num = int(input("Enter the answer to 12 + 14: "))
print("Correct! You have been awarded 1 point!")
This code is better, but the user doesn’t receive any useful feedback inside the loop. We may want to let them know that their answer was incorrect.
num = 0
while num != 26:
    num = int(input("Enter the answer to 12 + 14: "))
    if num != 26:
        print("Incorrect. Try again.")
    else:
        print("Correct! You have been awarded 1 point!")
print("Next question...")
While it may seem inefficient to be testing num != 26 twice, it does provide a better user experience and doesn’t affect performance in any meaningful way. This might be different if our condition included complex math, however. Feel free to try and re-write this program to use fewer lines.
While loops can be dangerous because if you never reach a situation where the condition becomes False, the loop will continue until the user terminates the program. If you ever need to terminate a Python script, you can press Ctrl+d to do so. Most users won’t know this shortcut, so let’s provide our user with the option to skip the question:
num = 0
while num != 26:
    user_input = input("Enter the answer to 12 + 14, or press 's' to skip: ")
    if user_input == 's':
        break
    else:
        num = int(user_input)
    if num != 26:
        print("Incorrect. Try again.")
    else:
        print("Correct! You have been awarded 1 point!")
print("Next question...")lab3a.py.Enter the answer to 12 + 14, or press 's' to skip: 27
Incorrect. Try again.
Enter the answer to 12 + 14, or press 's' to skip: 26
Correct! You have been awarded 1 point!"
Next question...
Enter the answer to 23 + 8, or press 's' to skip: s
Question skipped. 0 points awarded.
Enter the answer to 30 + 13, or press 's' to skip: 43
Correct! You have been awarded 1 point!"
Next question...
Enter the answer to 17 + 27, or press 's' to skip: 44
Correct! You have been awarded 1 point!"
You received a grade of 75.0%.In the previous lab, we learned about pseudocode. Like the name implies, this isn’t real code, but should communicate the logic that will eventually become part of the program.
In professional practice, we often use diagrams to accomplish something similar: we can use a flow chart to map out the types of logic that will make up our program.
Here is an example of a flow chart for the first code example in this lab:
The different shapes have special meaning which should you should take into account. Here are a few:

One advantage of flow charts over pseudocode is that it is far more obvious where looping and iteration will occur. Consider this example using a while loop:

x inside the loop.lab3b.py and include it in your lab submission.0
1
2
3
4
5
6
7
8
9
10
finishedFor this next section, open VSCode and enter the following:
sum = 0
print("SUMMING CALCULATOR")
while True:
    print("The sum so far: " + str(sum))
    user_input = input("Enter a number to add to your sum. Pressing Enter will exit. ")
    if user_input == "":
        break
    else:
        sum += int(user_input)
print("Thank you for using summing calculator. The final sum was " + str(sum) + ".")
Using while True turns this into an infinite loop, which is usually something we want to avoid. It essentially tests if True == True, with no way of modifying this condition after each iteration. The only way to break out of the loop is to press Enter, which will set user_input to "".
Notice we have created a new variable user_input and moved the conversion to int() onto a different line, only after we have tested to see if the user has entered blank input (Enter key with no other characters) to skip. The reason is if we try to run int(''), we will cause an exception. For now, let’s try to avoid exceptions using if statements, later on we will show ways to handle exceptions directly.
You’ll also notice a new operator: +=. To demonstrate how this works, we are going to step through our code.
lab3c.py.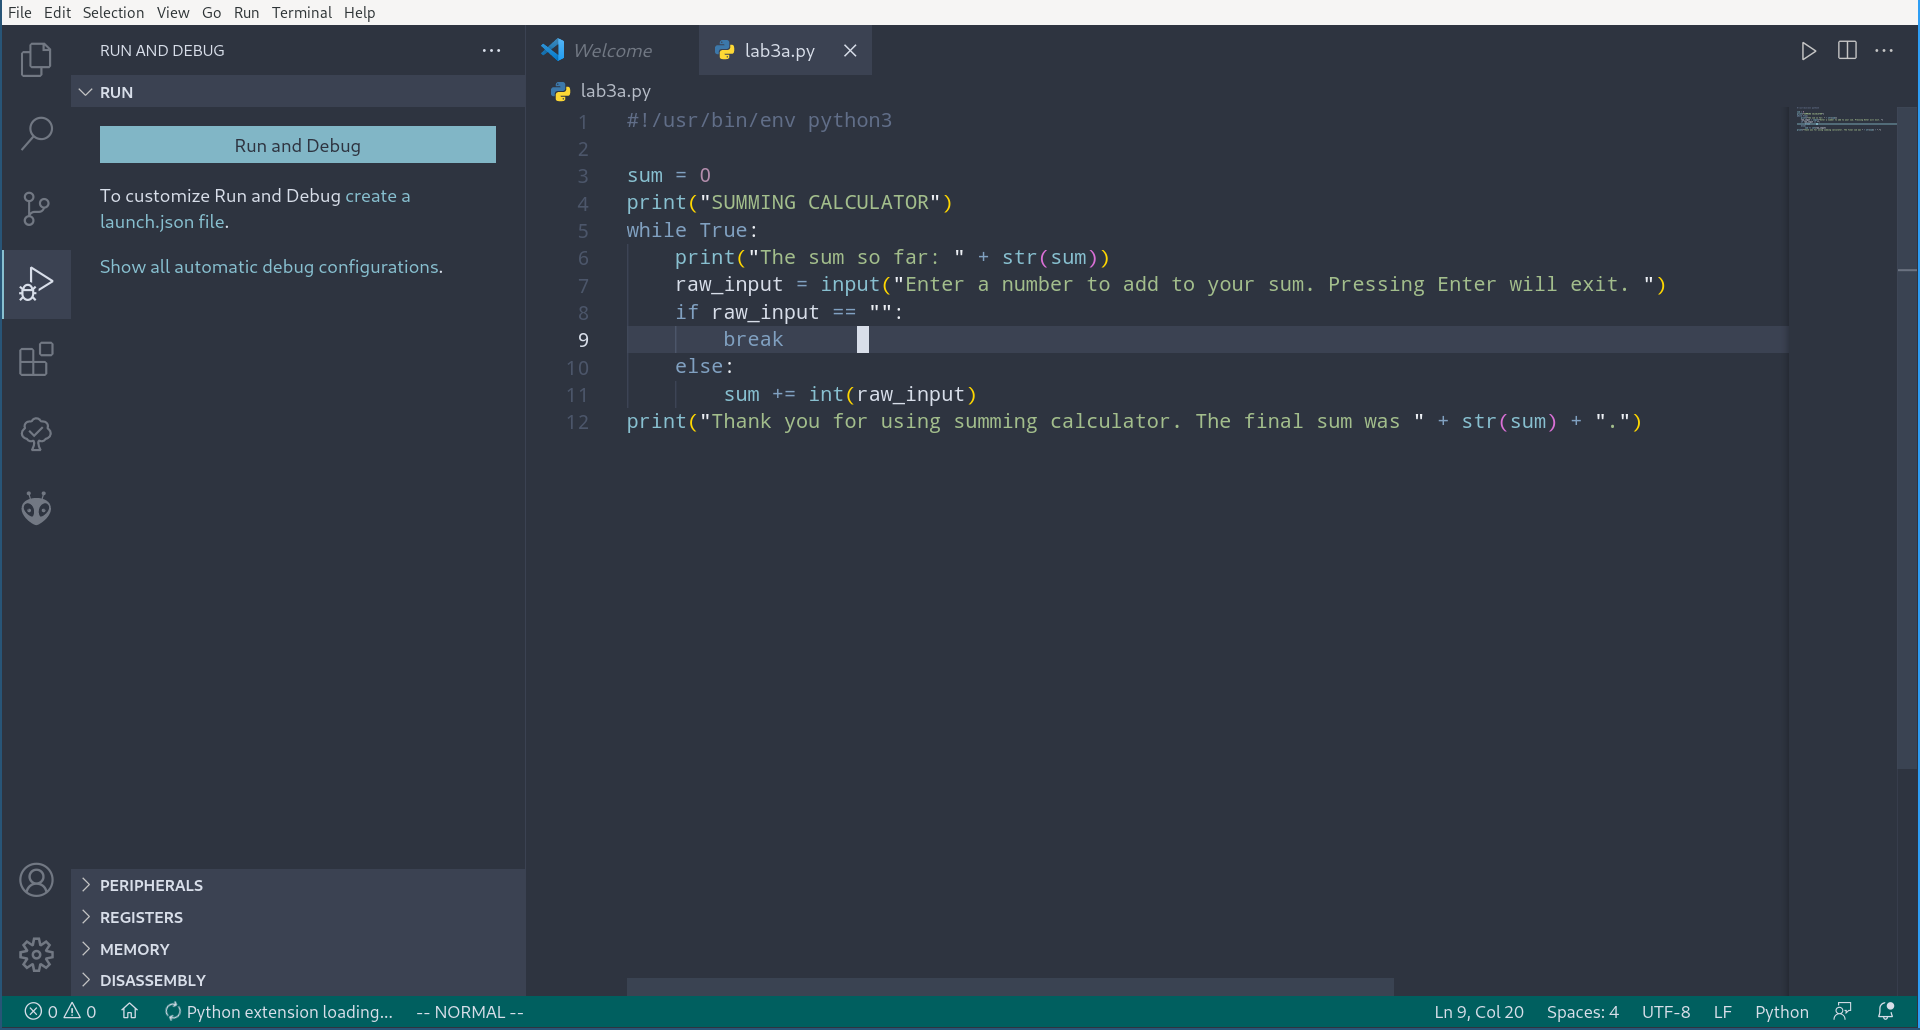
launch.json will open in a new tab. A JSON file is just another way of storing configuration data, but it can be confusing at first glance. Click “Add Configuration” and select “Python” from the drop-down list. If you do not see Python as an option, make sure you have installed the Python extension. 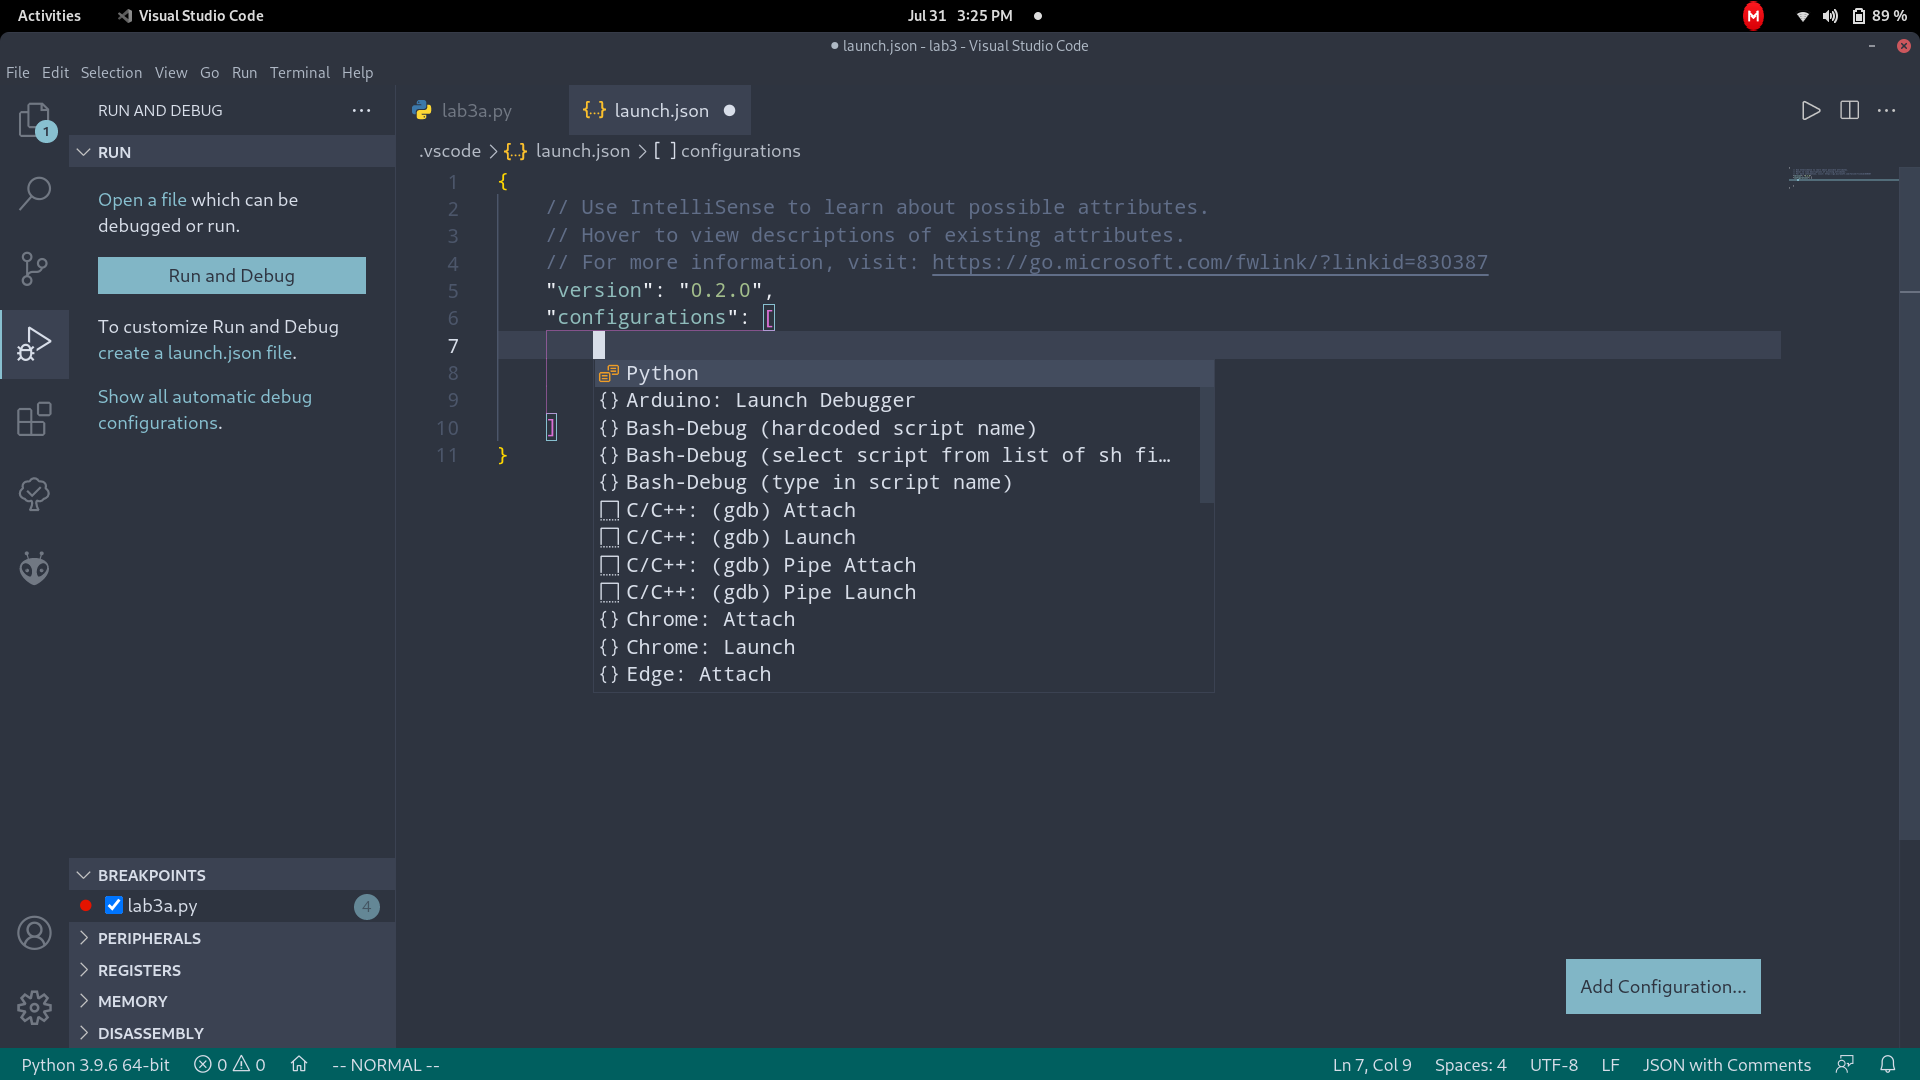 By creating a
 launch.json file, we can save our Python settings and won’t have to specify ‘Python’ each time we run the file. Press Ctrl+s to save launch.json with its default values. Your launch.json file should look similar to mine, and in the top-left corner you should have an option to run “Python: Current File”. 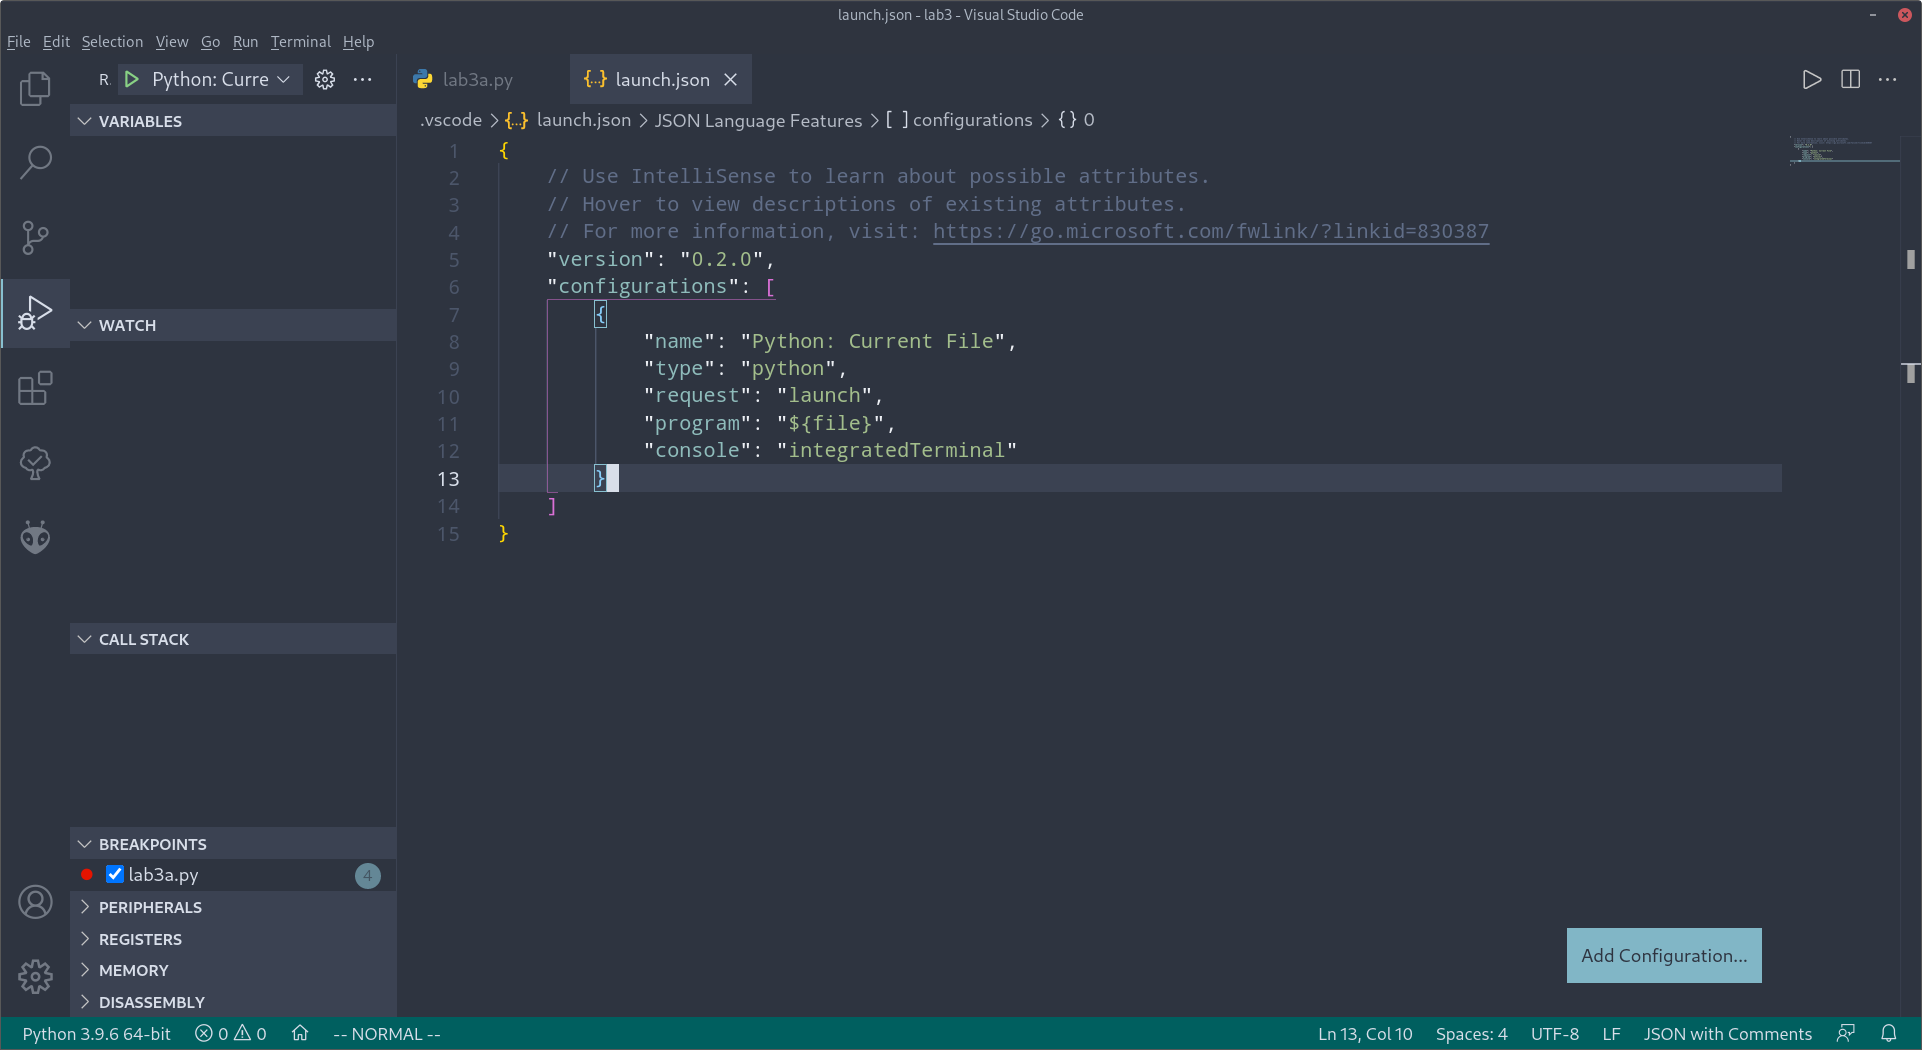
launch.json and return to lab3c.py. You should see a play button appear in the left panel. Press that now. In the terminal that appears, you should be able to interact with your program normally.The real power of the debugger occurs when we set break points. Break points will allow us to ‘pause’ the program at various stages, and examine the state of variables.
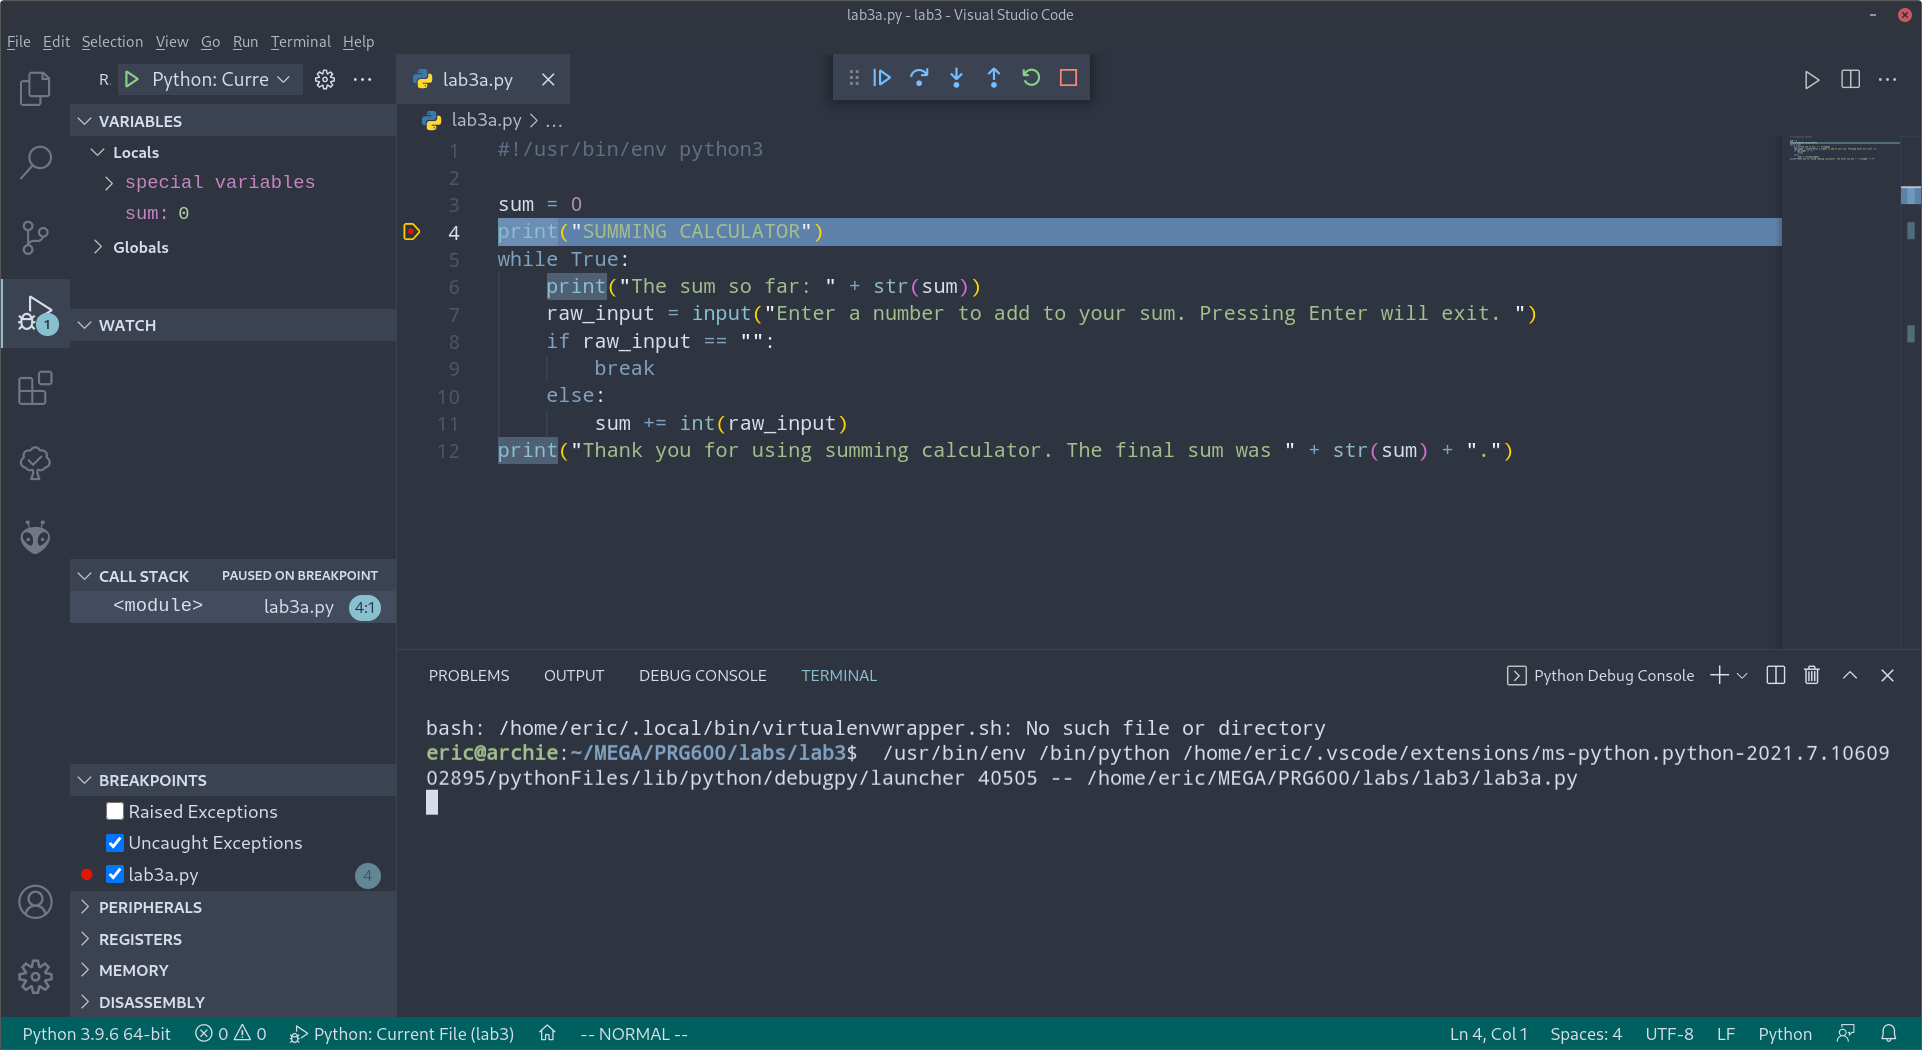
SUMMING CALCULATOR” has been printed. Look in the top-left corner, for the panel that says “Variables”. You should see sum listed there, with its initial value of 0.user_input equals ‘3’. Use “Step over” once again to advance so that the arrow has returned to the top of loop.sum should now equal 7, and you should once again be at the top of the loop for the third iteration. This time around, you can press Enter to stop the program.+= do? As you saw, the initial value of sum is preserved, while the value of user_input is added. sum += user_input is just another way of writing sum = sum + user_input.Note:
There are other special incremental operators for each major mathematical operation: +=, -=, *= and /=.
We are going to iterate on a game where the user guesses a number between 1 and 10. By ‘iterate’, we mean that we will start by building a minimal program and gradually add features.
For this first iteration, we will hard-code a secret number of 7. The user will enter their guess, and the game will continue for as long as it takes for the user to guess the number.
secret = 7
user_guess = 0You will start by creating a Flow Chart for your code. Use the example code in 3.1 to help you do this. There are many, many programs and apps that will help you create flow charts:
I recommend Draw.io, it requires no installation and is fairly intuitive. Whatever you use, please export your flow chart as a PDF File named flowchart.pdf. Include it in your lab submission.
Use what you’ve learned to create a while loop that checks if user_guess is equal to secret. It will be easier to build upon this game if we don’t put 7 directly in our while instruction. Eventually we are going to set a new number each time we run the game.
Guess a number between 1 and 10: 3
Sorry, that's not it.
Guess a number between 1 and 10: 5
Sorry, that's not it.
Guess a number between 1 and 10: 7
Correct! You win.lab3d.py and include it with your lab submission.input into an integer.Python is an incredibly popular programming language for a couple of reasons: compared to a lot of other programming languages, it’s quick easy to read. But the other reason is because of its Standard Library. You see, Python comes with a lot of useful functions and tools included. Some functions (such as print() and input()) are so common that they are built into the language itself. A lot of other functions, however, are only useful in certain situations. Code like this are stored in Modules and so we can import them only when needed.
One such module is random. This module contains a lot of functions that allow you to work with random numbers. You can make use of these functions by adding the following code to the top of your script:
import randomIf you only need one function, it’s usually better to specify that instead. Our guessing game is going to use a function to choose a random number inside a range of possible values. These numbers need to be whole numbers so that the game is fair.
lab3d.py if you don’t have it open already.from random import randintsecret = 7, replace 7 with the following: randint(1, 10).randint will return an integer between a range. The highest possible value will be 10.lab3d.py and test the code using the debugger. Use what you’ve learned to verify that the secret variable changes each time you run.There are many, many modules in the Python standard library, meaning that Python is a good language to accomplish all kinds of tasks. In the future when you tackle new challenges, remember to check and see if there is a module that you can use. It’s always better to use an existing tool if possible.
Guess a number between 1 and 10: 3
Sorry, that's not it.
Please enter a valid number between 1 and 10.
Guess a number between 1 and 10: 7
Sorry, that's not it.
Guess a number between 1 and 10: 4
Correct! You win.lab3a.py file and name it lab3e.py.random module.'q' to quit.'q' on as a fail, only the questions they skipped.Enter the answer to 1 + 6, press 's' to skip or 'q' to quit: 27
Incorrect. Try again.
Enter the answer to 1 + 6, or press 's' to skip or 'q' to quit: 7
Correct! You have been awarded 1 point!"
Next question...
Enter the answer to 2 + 18, or press 's' to skip: s
Question skipped. 0 points awarded.
Enter the answer to 17 + 5, or press 's' to skip: q
Quiz over. You scored 50.0%.The check script can be found here.
Binary numbers are used internally by all computers. Binary numbers are composed only of ones and zeroes. If you would like an introduction to binary systems, you can visit Khan Academy or refer to my notes.
One way to convert a decimal number into binary is to use the following procedure (again, my notes cover this process in much more detail):
Use this process to complete challenge3.py.
input to ask the user for a decimal number.bin() function to check your work.lab3a.pylab3b.pylab3c.pylab3d.pylab3e.pyflowchart.pdfchallenge3.pylab3-check-output.txt